Friday, October 4, 2024

FTO

Speedcube Shop has beening running an ad lately for a new FTO. It is stickerless which is a plus and has magnets which might be helpful for doing slice moves. Although it is very appealing, it has been so long since I've solved my old FTO with icky stickers that I'm not really sure I would get my money's worth out of a new one. Since I have enough extra stickers on hand that replacing the stickers is an option, it would be good to know if it is worth the hassle. 

Before looking up what I had done before I wanted to try to solve it and see if I could. There are only 3 kinds of pieces: corners, edges, and centers. It is pretty easy to solve the corners using simple moves. I wasn't quite sure how I did it but the corners were easily solved. Later when I did look at notes I had made years ago, it says solve the white corners then either the yellows are solved or are one EPS away. The next thing I did was use setup moves and an 8-move 3-cycle to solve the edges after sliding whichever ones I could into place without messing up others. Setup moves and another 8-move 3-cycle can be used to solve all the centers. 

This method is very simple and straightforward to me, and I believe that I worked out this solution years ago. But then I saw how others did it, or at least one other method, and it solved centers after the corners and used some simple up-replace-down moves to do so, but there was a little bit of a complexity to it too inthat the white layer had to be in the back left or back right, and you could only solve half the centers this way so had to know which colors you could do. I guess back then it impressed me enough to write it down. After all there are 24 centers, so if you can do half of them in a relatively easy manner, why not, but in solving it today I naturally reverted to my commutator method. 

It might be good to see if I can wrap my head around using up-replace-down-goback for some of the edges. There are only 12 edges, but if I can do some of them with only 4 moves instead of 8, why not? 

Why do I like my method even though it may not be the most efficient as far as moves go? It is totally a visual thing. I find it easiest to work with the centers when the edges are already in place. 

Replacing the old icky stickers with a new set of leftover stickers from a past stickering project seemed like a good idea. After removing the old ones I was doing my best to clean the residue off the puzzle when it popped apart and a few pieces came loose. Instead of pushing them back in I decided to take the whole thing apart and and clean them all best I could. Lubing the springs seemed like the next logical step. Now the FTO is totally reassembled and stickered. Making equilateral triangle stickers out of square stickers did not have perfect results, but it works. And they feel much better than the old ones.

Now, back to the commutators. I finally finished the new improved FTO solution guide in a Google Doc. Yay.

Wednesday, September 18, 2024

Mixup Cube

Need to flip edges at FR and BR? We have options. I could use either of the two edge flippers I know for the 3x3x3 cube. Or I could treat them as centers and use the center twisting alg where you move them to the top and twist them. But when we were taking Rory and Roark to the airport yesterday I came up with a new method that is the best of all of them.

(E 45 degrees right; R2; E 45 degrees left; R2) x 2


3x3x4 Mixup Plus revisited

 September 2024 I watched twistypuzzling solve a Son-Mum and it inspired me to get out my Mixup cubes and try to solve them. 


3x3x4 Mixup Plus Scramble

Thin layers. 180° on perpendicular layers; 45x° on thin layers. Some scrambling of the white and yellow 3x3s will take place.

White and Yellow Edges. Break up the inner edge pieces from the outer edge pieces.

Corners. Scramble the corners as if it were a 3x3x3.


I think this is it! 3x3x4 Solution Guide based on my blog of June 6, 2020 and personal experiences trying to implement it.

  1. Yellow and White Centers. Hold them on R and L for the next step.

  2. Reduce the White and Yellow Edges. 

    1. Put as many tweaked (not flat) inner edges as possible on M. M45. That flattens them. 

    2. Pair up flattened inner edges with outer edges of the same color. Line up a white outer edge at BU with a white inner edge at FD. M up 45°, U2, M down 45°.

    3. If there are no more to pair because some outer edges are misoriented, use the center twisting algorithm to orient outer edges, then pair up more.

    4. If more tweaked edges need flattened and/or outer edges are in centers, move them to M and M45. Orient the outer corners if necessary.Then finish up the outer/inner pairing. That is, the building of the Yellow and White edges.

  3. Move the E-layer pieces to the E-layer. URD should suffice to do this.

  4. If possible and helpful use moves like R2 to get edge pieces that are in center spots all on the same layer. Twist the layer 45 to fix them all at once after orienting all the E-layer pieces by taking them to the top, twisting 90°, and taking them back to the E-layer.

  5. Permute All Center Pieces to Center Locations Ignoring Color, Use the 3x3x2 Corner Commutator. You don’t have to turn an inner slice since the corners aren’t solved yet. 

  6. Yellow and White Layers using Corners First.

  7. E-layer Center Re-orientation then Permutation. Permuate using The Move, similar to solving the edges of a 3x3x2.

  8. E-layer Outer Edges using the 3x3x2 method. If you get down to a single swap of corners needed, hold the cube so the two that need to swap are neither on the lower left and do U R2 U R2 U R2 U R2 U. The centers are good and the corners will solve now. There is a better way. Get the two edges that need to swap together at one corner. Take the adjacent center to the top and U2. Take it down and replace it with the edges that need to swap. Take them to the top and U2. Take them down and put them back.

  9. E-layer Inner Edges. ((u 45° left) L2 (u 45° right) R2) x 2 moves A to B to C. A’s flatness stays; the flatness of B and C change. This is the 3x3x2 Corner Commutator where A is on the top layer in the front.


Making progress but not quite there yet.

3x3x4 Solution Guide based on present personal experience along with my previous notes on the blog June 6, 2020.

  1. Yellow and White Centers. Put the white center in an edge spot. Without moving it, move the yellow center to the diagonally opposite spot. Move the layer they are in 45° so they are in center spots. Hold them on the right and left for now. 

  2. Flatten white and yellow inner edge pieces as much as possible. How? Line up as many as possible in the M layer. Twist it 45°. Voila. They are flat.

  3. Move white and yellow outer edge pieces to outer edge spots as much as possible. Use the Edge 8-move 3-cycle like the one used to do the last 3 E-layer edges of a 4x4 cube.

  4. Orient white and yellow outer edge pieces as much as possible. Use the center twister algorithm (I didn’t do it exactly. I kept going clock instead of alternating and ended up unflattening some white and yellow inner edges. 😕).

  5. Build white and yellow edges as much as possible. Outer edge at UB. Inner edge at FD. M 45° up. U2. M 45° down.

  6. Flatten more? Move and orient more white and yellow outer edges to outer edge spots? Build the rest of the white and yellow edges?

  7. Hold yellow and white on top and bottom.

  8. Move all the E-layer pieces to the E-layer using like DDUU and UFD.

  9. Orient all the E-layer pieces. This is a simple process. Take them to the top, twist it 90°, and take it back to the E-layer.

  10. Permute All Center Pieces to Center Locations Ignoring Color. Use the 3x3x2 Corner Commutator. You don’t have to turn an inner slice since the corners aren’t solved yet.

  11. Solve white and yellow layers using the Corners First Method.

  12. Orient middle layer pieces if necessary using the almost complete center twisting algorithm. (M up) U (M down) (E whatever) (M up) U* (M down).

  13. E-layer Center Permutation using The Move, similar to solving the edges of a 3x3x2.

  14. E-layer Outer Edges using the 3x3x2 method. If you get down to a single swap of corners needed, hold the cube so the two that need to swap are neither on the lower left and do u R2 u R2 u R2 u R2 u. Lowercase u means the E-layer u only. The centers are good and the corners will solve now.

  15. E-layer Inner Edges. ((u 45° left) L2 (u 45° right) R2) x 2 moves A to B to C. A’s flatness stays; the flatness of B and C change. This is the 3x3x2 Corner Commutator where A is on the top layer in the front.

Wednesday, June 28, 2023

Summer 2023 Puzzle Adventures

Last summer I had fun doing twisty puzzles with the Czech kiddos at my house. Some of the puzzles even got to leave with them and travel around the world. The yellow Bump Cube and the Carbon Fiber 3x3x3 went with Annie. The Redi Cube and a Six Spot Cube went with Alex. A 2x2 Cube and the Rediminx went with David. Annie and Alex each mastered the ones they took along with them. David is great at the 2x2 using the 3-step method Solution Guide we made together. And we played a little with the Rediminx and I'm confident that he will be able to figure it out. 

Well... the Carbon Fiber 3x3x3 got trashed. Some of the stickers got pealed off and pealed back. I am going to take it home with me and resticker it with normal stickers. Maybe make a sticker mod of some sort. Maybe give the kiddos some sticker mod options and see what they want. Or see if they can come up with one of their own. One corner of the 2x2x2 I sent home last summer also got trashed. Two of the three pieces were missing. We went through two toy drawers and found one of the missing pieces but not the other one. David did not keep working on the 2x2 after he went home last summer so is relearning how to solve it this summer. He did not figure out the Rediminx either although he could get it partly solved. 

A short time ago Breann bought a 4x4 cube with Carbon Fiber stickers and a set of puzzles consisting of a 2x2, 3x3, 4x4, and Pyraminx. Alex wanted to learn the 4x4 so I prepared some lessons. The method I taught him to solve the corners is the same one used to solve the 2x2, so he is also learning to solve a 2x2. And of course he will be able to solve a 3x3 after he masters the 4x4. 

I hope that after David can solve the 2x2 that he will learn how to solve the 2x2 blindfolded. We shall see.

What about Annie? I brought the Penrose cube. She solved it color-wise but needed a double swap to get the sticker stripes correct. I did it for her and showed her. 

The last time we solved the Rediminx we got creative with it.


Sunday, October 23, 2022

Random Puzzle Info

 I can't find any notes on flipping a center piece. Usually when solving a puzzle that might need a center flipped I find a way to avoid the situation, but what if I don't? Will I remember? I mean it doesn't really happen often enough to keep it fresh. So here it is: (LRU LiRiU2) x 2

When solving corners first and I have to 3-cycle edges at the end I always have to stop and think and sometimes experiment. To 3-cycle middle layer edges including UB to UF, with the correct one at FD: Mv U2 M^ U2.

Let's document here the basic steps of solving a 3x3 cube Corners First.

1. Corners using 2x2 Cube technique.

2. Yellow and White edges.

3. Middle Layer Edges.

Tuesday, October 11, 2022

Speaking of Frisbee Golf...

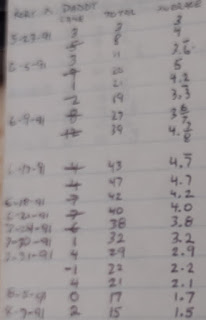
In our heyday of Family Frisbee Golf in our front yard we kept track of many of the games in this little Memo pad. 
March through June of 1990. Rory was 13. Every hole was par 2. We totaled our scores for each hole. We counted the best 10 games. So the 15 at the bottom means that we were a total of 15 over par for the best 10 games, or an average of 1.5 over par per game.
With 10-year old Raymond included during the same time frame we were an average of 6.1 over per game for the best 10 games.
Team Speed. Huh??? I remember Team Speed, but the pages I have here... ??? One obvious thing on this page is that we understandably did much better in 2000 than in 1990. When I remember Team Speed I remember Rory and I throwing and Raymond blocking. And what is this Team Speed Relay thing? Two throwers and one blocker at each hole switching at each hole. I vaguely remember that.
In 2000 I'd say I was going slower with times of 9 and 7. It looks like Robert was the star on that day. 6 ones. Nice.
1990 all 4 of us. Check out that final total of the best 10. 34 under par! Wow!

Totals for the different teams we played with all on one page.
All 4 1991
Rory and Daddy 1991


More 1991 Scores


1992 Scores

1993 Scores
This is the end of the Memo pad. It has been almost 30 years since we kept track of scores. In 1993 Rory turned 17, Raymond turned 13, Robert turned 11, and I turned 41. 


Thursday, October 6, 2022

Old Treasures and Blasts From The Past


I posted this Skewb Collection a couple days ago on Craigslist.
Dino Skewb, Ultimate Skewb, Curvy Rhombohedron, Squished Skewb.


Apple//e Software

Calendar Maker was a program I wrote to print out calendars on a dot matrix printer for Dad. He was really into birhtday calendars.

I had a program published on Softdisk! Loose Change. They totally reworked the graphics and I didn't even feel like it was mine any more, but the idea was mine for sure. When I taught algebra at FLCS we had some word problems that gave a given amount of money made from an known number of coins. The object was to use two equations with two unknowns to figure out how many of each coin there is. I had left a problem on the board one day and after school Rory, when he was 12 give or take, quickly figured it out in his head, no algebra required. I started giving him problems like this for fun and programmed a computer game for him based on these problems. 

IO Silver was a game we liked published by Beagle Bros. Software in 1984. All I remember is using 4 keys on the keyboard to make the little guy run around the screen collecting things.

The Rory and Raymond disks were... hmmm... I seem to recall making a game disk for each boy. When you booted it up it ran a math practice thing or something that they had to pass in order to get to the fun games. I think that is how it worked.

Loderunner. Ahhh. Loderunner. How many hours I spent playing the 150 levels and making levels of my own. A quick online search uncovered an online version so I can play the Apple //e version on my Chromebook! Lode Runner Web Game

Dino Eggs. One of the games that came on Softdisk. I think we played it quite a bit but I have no recollection of the details. Good news. Some guy made a video on YouTube. Dino Eggs And in the description there is a comment by the original creator and a link to his story about making the game.

Super Boulder Dash. Did it come from Softdisk too? Don't recall. It was fun and engaging enough to have and keep but I do not remember it either. Again, it can be found on YouTube.

Championship Lode Runner. This added another 50 levels to the original 150. I was so pleased that I could pass them all I documented it on the label. 

AppleWorks 4. Oh oh oh. AppleWorks on the //e. Fond memories. 

Math Blaster. This was the best version of Math Blaster in my opinion. The Mac version did not appeal to me at all. I loved the Apple //e Math Blaster game. Rory was the Math Blaster Champion.


The Beagle Bros. !!! I had quite a collection of their software for the Apple //e.

I learned about Fractals on an Apple //e. Oh yeah. Green monitor. Relatively slow processor. I would start one before I went home for the day and hope it would be finished by the morning. But I was fascinated by the math behind the graphics.

If I remember correctly Myst was for the //e, DuelTris was for the Apple 2gs, and obviously the book was written for Mac users. I think I completed Myst. DuelTris was a fun 2-player form of Tetris. And the book was very influential in teaching me how to take advantage of the Mac word processor instead of trying to type on the computer as if it was simply a typewriter.

In 2003 the boys and I made up a new Frisbee Golf game on our home course of 15 "holes". We called them holes even though they were really trees, rocks, a ditch, and a swingset. Over the years we played a lot of Frisbee Golf. And for the most part we used normal Frisbees, not the new fangled disc golf discs. Sometimes we played each person against the others. Usually we played teams. Sometimes one team against another, but usually the team was all of us. We were seeing how low a score we could get. At one point in our history of Frisbee Golf games we played Speed Frisbee. I'd time the game on my wristwatch and we would play as a team, usually Rory and I throwing and Raymond blocking to keep the Frisbees as close to the holes as possible. We would combine the times and scores to get the final score. I kept track in a little notebook. But in 2003 we made up a new game. How many throws does it take to get all ones? Our bests:
Ro & I: 66 on September 6, 2003
Rory, Robert & I: 54 on October 21, 2003
Raymond & I: 62 on October 8, 2004
Rory & Raymond: 38 on August 4, 2007

As far as I know we haven't tried since.

Tuesday, September 13, 2022

Big Cube Designs

 Roark and I had fun with patterns during a recent visit. He also shared with me how one magician who does Rubik's Cube magic does one of his tricks by setting the cube up so 3 sides are scrambled while the other 3 look solved. Gave me an idea...


The above pictures are one and the same cube seen from two angles. Half the cube looks solved with a nice design on it; the other half is scrambled. I got to thinking though. What if instead of using orange, green, and white for the design, I used red, blue, and yellow? Then I should be able to solve the other half of the cube. I didn't want to start over with the 8x8x8, so I got out the 6x6x6. See below.


Now I'm thinking about doing a matching pattern on the Orange, Green, White side.


Monday, August 29, 2022

A Puzzling August

I had a lot of fun puzzling with the kiddos (and Rory!) in the summer of 2022. We mainly did 3x3x3 cubing in Washington, then had fun with the bright yellow Bump Cube, the Redi Cube, and 2x2x2 puzzles here. After everyone was home again I decided it was time to brush up on solving various puzzles.

Clover Cube Plus
Skewb Xtreme
Double Circle Cube
Square-1
Tangram Cube
Axis Cube
Windmill Cube
Fisher Time Wheel
Clover Pyraminx (it is really a 3x3x3)
3x3x2 and 2x2x3
2x3x4 & 3x3x1

I'm having trouble with the 2x3x4. I've looked at past solution strategies and well, nothing feels right. Oh, I've been able to solve it several times over the last few days but I don't really have a strategy I am settled in on. I have not been using reduction. Solving the inner 2x2x3 is always part of it.

On the way to solving the 2x2x3 if you need to solve centers after the whites and yellows are solved, there is a 4 move sequence that 3-cycles them. With a 2x3 in front and a 3x4 on top M down U2 M up U2 3-cycles the M layer center-edge pairs from UF to UB to DB. So say you have red up and an orange center at UB and a red center at DB. M down U2 M up U2 solves the centers.

To swap the blue orange and blue red edges use a setup sequence so they are opposite one another on a 3x4 side then use (R2 U2) x 3 to swap them along with two phantom edges. 

To cycle URF to DRB to DLF do (U L2 U' R2) x 2 (R2 F2) (U L2 U' R2) x 2 (F2 R2). 

To cycle ULF to DLB to DRF do (U' R2 U L2) x 2 (L2 F2) (U' R2 U L2) x 2 (F2 L2).

To double swap ULF with URB and DLF with DRB do R2 F2 R2. 

To double swap ULF with DLB and DLF with ULB do L2 then swap the white and yellow edges back using a double swap with phantom edges.

(F2 D2 F2 D2) = (URF 3-cycle) + (ULF 3-cycle)

I have scrambled and solved this puzzle multiple times now without much trouble at all. No major issues.